Как добавить ярлыки для шаблонов на ленте в Outlook?
Частое применение шаблонов для электронных писем с одинаковым текстом, макетом или специальным форматированием значительно экономит время. Однако поиск этих шаблонов каждый раз может быть утомительным и отнимать много времени. К счастью, существуют эффективные методы добавления ярлыков к шаблонам непосредственно на ленту Microsoft Outlook, что позволяет применять шаблоны одним щелчком мыши.
Добавление ярлыка к шаблону на ленте путем создания быстрых шагов
Добавление ярлыка к шаблону на ленте путем добавления Выбор Форм в Панель Быстрого Доступа
Добавление ярлыка к шаблону на ленте путем создания быстрых шагов
Если вы часто отправляете электронные письма с каким-то специальным текстом, вы можете создать шаблон с этим специальным текстом и добавить его в окно Быстрых Шагов.
Шаг 1: Нажмите Создать Новый в группе Быстрые Шаги под вкладкой Главная.

Шаг 2: В диалоговом окне Редактирование Быстрого Шага,
- Введите имя для нового шаблона в поле Имя:
- Нажмите в поле Выберите Действие и выберите Новое Сообщение из выпадающего списка.

Шаг 3: Нажмите Показать Опции под полем Кому…
Шаг 4: Добавьте информацию в новый шаблон следующим образом:
- Введите адреса получателей в поле Кому…
- Введите информацию о теме в поле Тема:
- Установите флаг и важность.
- Введите специальный текст в поле Текст:
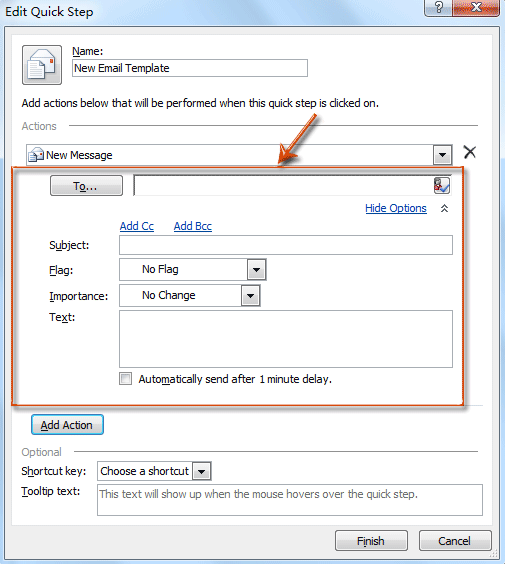
Шаг 5: Нажмите кнопку Завершить.
На данный момент новый шаблон был добавлен в окно Быстрых Шагов, отображаясь под именем, которое вы ввели на Шаге 2.

AI Mail Assistant в Outlook: Умные ответы, четкое общение (волшебство в один клик!) БЕСПЛАТНО
Оптимизируйте свои ежедневные задачи в Outlook с помощью AI Mail Assistant от Kutools для Outlook. Этот мощный инструмент изучает ваши прошлые письма, чтобы предлагать умные и точные ответы, оптимизировать содержание ваших писем и помогать легко создавать и редактировать сообщения.

Эта функция поддерживает:
- Умные ответы: Получайте ответы, созданные на основе ваших предыдущих разговоров — персонализированные, точные и готовые к отправке.
- Улучшенное содержание: Автоматически улучшайте текст ваших писем для большей ясности и воздействия.
- Простое составление: Просто укажите ключевые слова, и пусть ИИ сделает остальную работу, предлагая несколько стилей написания.
- Интеллектуальные расширения: Расширяйте свои мысли с помощью контекстно-зависимых предложений.
- Суммаризация: Мгновенно получайте краткие обзоры длинных писем.
- Глобальный охват: Легко переводите ваши письма на любой язык.
Эта функция поддерживает:
- Умные ответы на письма
- Оптимизированное содержание
- Черновики на основе ключевых слов
- Интеллектуальное расширение содержания
- Краткое изложение писем
- Перевод на несколько языков
Лучше всего то, что эта функция будет полностью бесплатной навсегда! Не ждите — скачайте AI Mail Assistant прямо сейчас и наслаждайтесь
Добавление ярлыка к шаблону на ленте путем добавления Выбор Форм в Панель Быстрого Доступа
Чаще всего вы отправляете электронные письма не только со специальным текстом, но и с особыми макетами и стилями форматирования. Этот метод поможет вам открыть библиотеку шаблонов и быстро выбрать и применить шаблоны.
Шаг 1: Откройте библиотеку шаблонов, нажав Новые Элементы > Другие Элементы > Выбрать Формы;
Шаг 2: В диалоговом окне Выбор Формы выберите Стандартные шаблоны в Просмотреть в: поле, или нажмите кнопку ![]() Обзор чтобы найти шаблоны.
Обзор чтобы найти шаблоны.

Вы можете добавить команду Выбор Формы на Панель Быстрого Доступа в Microsoft Outlook 2010 и 2013. Существует несколько способов это сделать.
Метод А:
Шаг 1: Нажмите Новые Элементы > Другие Элементы.
Шаг 2: Щелкните правой кнопкой мыши элемент Выбор Формы.
Шаг 3: В контекстном меню выберите пункт Добавить на Панель Быстрого Доступа.

Затем команда Выбор![]() Формы добавляется на Панель Быстрого Доступа немедленно.
Формы добавляется на Панель Быстрого Доступа немедленно.
Метод B:
Шаг 1: Нажмите Файл > Параметры.
Шаг 2: В диалоговом окне Параметры Outlook нажмите Панель Быстрого Доступа в левой панели.
Шаг 3: В поле Выбрать команды из: нажмите кнопку и выберите Все Команды из выпадающего списка.
Шаг 5: Выберите и выделите элемент Выбор Формы в поле команд.

Шаг 6: Нажмите кнопку Добавить.
Шаг 7: Нажмите кнопку OK.
Теперь команда Выбор Формы появляется на Панели Быстрого Доступа сразу.
Лучшие инструменты для повышения продуктивности работы с Office
Срочные новости: бесплатная версия Kutools для Outlook уже доступна!
Оцените обновленный Kutools для Outlook с более чем100 невероятными функциями! Нажмите, чтобы скачать прямо сейчас!
📧 Автоматизация Email: Автоответчик (Доступно для POP и IMAP) / Запланировать отправку писем / Авто Копия/Скрытая копия по правилам при отправке писем / Автоматическое перенаправление (Расширенное правило) / Автоматически добавить приветствие / Авторазделение Email с несколькими получателями на отдельные письма ...
📨 Управление Email: Отозвать письмо / Блокировать вредоносные письма по теме и другим критериям / Удалить дубликаты / Расширенный Поиск / Организовать папки ...
📁 Вложения Pro: Пакетное сохранение / Пакетное открепление / Пакетное сжатие / Автосохранение / Автоматическое отсоединение / Автоматическое сжатие ...
🌟 Волшебство интерфейса: 😊Больше красивых и стильных эмодзи / Напоминание при поступлении важных писем / Свернуть Outlook вместо закрытия ...
👍 Удобные функции одним кликом: Ответить всем с вложениями / Антифишинговая Email / 🕘Показать часовой пояс отправителя ...
👩🏼🤝👩🏻 Контакты и Календарь: Пакетное добавление контактов из выбранных Email / Разделить группу контактов на отдельные / Удалить напоминание о дне рождения ...
Используйте Kutools на вашем языке – поддерживаются Английский, Испанский, Немецкий, Французский, Китайский и более40 других!


🚀 Скачайте все дополнения Office одним кликом
Рекомендуем: Kutools для Office (5-в-1)
Скачайте сразу пять установщиков одним кликом — Kutools для Excel, Outlook, Word, PowerPoint и Office Tab Pro. Нажмите, чтобы скачать прямо сейчас!
- ✅ Все просто: скачайте все пять установочных пакетов одним действием.
- 🚀 Готово для любой задачи Office: Установите нужные дополнения тогда, когда они вам понадобятся.
- 🧰 Включено: Kutools для Excel / Kutools для Outlook / Kutools для Word / Office Tab Pro / Kutools для PowerPoint