Перейти к основному содержанию

Как создать командную кнопку для копирования и вставки данных в Excel?

Предположим, вам нужно часто копировать диапазон ячеек в другое место после изменения данных, метод копирования и вставки вручную будет сложным и трудоемким. Как сделать так, чтобы это дело копирования и вставки запускалось автоматически? В этой статье показано, как использовать командную кнопку для копирования и вставки данных одним щелчком мыши.

Создайте командную кнопку для копирования и вставки данных с кодом VBA


Создайте командную кнопку для копирования и вставки данных с кодом VBA

Чтобы автоматически копировать и вставлять данные при нажатии кнопки управления, сделайте следующее.

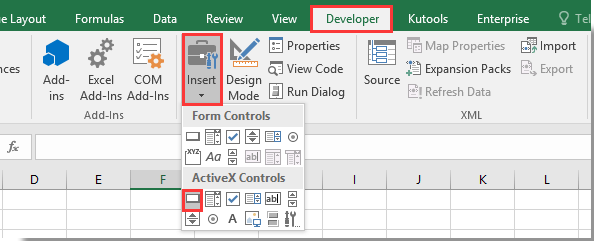
1. Вставьте командную кнопку, нажав Застройщик > Вставить > Командная кнопка (элемент управления ActiveX). Смотрите скриншот:

2. Нарисуйте кнопку Command на листе и щелкните ее правой кнопкой мыши. Выбрать Просмотреть код из контекстного меню.

3. Во всплывающем Microsoft Visual Basic для приложений В окне кода замените исходный код в окне кода приведенным ниже кодом VBA.

Код VBA: используйте командную кнопку для копирования и вставки данных в Excel

Private Sub CommandButton1_Click()
    Application.ScreenUpdating = False
    Dim xSheet As Worksheet
    Set xSheet = ActiveSheet
        If xSheet.Name <> "Definitions" And xSheet.Name <> "fx" And xSheet.Name <> "Needs" Then
            xSheet.Range("A1:C17 ").Copy
            xSheet.Range("J1:L17").PasteSpecial Paste:=xlValues, Operation:=xlNone, SkipBlanks:=False, Transpose:=False
        End If

    Application.ScreenUpdating = True
End Sub

Внимание: В коде CommandButton1 - это имя вставленной вами командной кнопки. A1: C17 - это диапазон, который вам нужно скопировать, а J1: L17 - это целевой диапазон для вставки данных. Пожалуйста, измените их по своему усмотрению.

4. Нажмите другой + Q ключи, чтобы закрыть Microsoft Visual Basic для приложений окно. И выключите режим дизайна на вкладке разработчика.

5. Теперь нажмите кнопку Command, все данные в диапазоне A1: C17 будут скопированы и вставлены в диапазон J1: L17 без форматирования ячеек.


Статьи по теме:

Лучшие инструменты для офисной работы

🤖 Kutools AI Помощник: Революционный анализ данных на основе: Интеллектуальное исполнение   |  Генерировать код  |  Создание пользовательских формул  |  Анализ данных и создание диаграмм  |  Вызов функций Kutools...
Популярные опции: Найдите, выделите или определите дубликаты   |  Удалить пустые строки   |  Объедините столбцы или ячейки без потери данных   |   Раунд без формулы ...
Супер поиск: Множественный критерий VLookup    VLookup с несколькими значениями  |   VLookup по нескольким листам   |   Нечеткий поиск ....
Расширенный раскрывающийся список: Быстрое создание раскрывающегося списка   |  Зависимый раскрывающийся список   |  Выпадающий список с множественным выбором ....
Менеджер столбцов: Добавить определенное количество столбцов  |  Переместить столбцы  |  Переключить статус видимости скрытых столбцов  |  Сравнить диапазоны и столбцы ...
Рекомендуемые функции: Сетка Фокус   |  Просмотр дизайна   |   Большой Формулный Бар    Менеджер книг и листов   |  Библиотека ресурсов (Авто текст)   |  Выбор даты   |  Комбинировать листы   |  Шифровать/дешифровать ячейки    Отправлять электронные письма по списку   |  Суперфильтр   |   Специальный фильтр (фильтровать жирным шрифтом/курсивом/зачеркиванием...) ...
15 лучших наборов инструментов12 Текст Инструменты (Добавить текст, Удалить символы, ...)   |   50+ График Тип (Диаграмма Ганта, ...)   |   40+ Практических Формулы (Рассчитать возраст по дню рождения, ...)   |   19 Вносимые Инструменты (Вставить QR-код, Вставить изображение из пути, ...)   |   12 Конверсия Инструменты (Числа в слова, Конверсия валюты, ...)   |   7 Слияние и разделение Инструменты (Расширенные ряды комбинирования, Разделить клетки, ...)   |   ... и более

Улучшите свои навыки работы с Excel с помощью Kutools for Excel и почувствуйте эффективность, как никогда раньше. Kutools for Excel предлагает более 300 расширенных функций для повышения производительности и экономии времени.  Нажмите здесь, чтобы получить функцию, которая вам нужна больше всего...

Описание


Вкладка Office: интерфейс с вкладками в Office и упрощение работы

  • Включение редактирования и чтения с вкладками в Word, Excel, PowerPoint, Издатель, доступ, Visio и проект.
  • Открывайте и создавайте несколько документов на новых вкладках одного окна, а не в новых окнах.
  • Повышает вашу продуктивность на 50% и сокращает количество щелчков мышью на сотни каждый день!
Comments (61)
Rated 4.5 out of 5 · 2 ratings
This comment was minimized by the moderator on the site
hello! have good day. i have a problem plz anyone could helpme. i have a data in my excel sheet. it has three types Plaining, Release and archive. I need a code such that when i click on Release the entire row cut from active sheet and pasted to another sheet i-e Released PR's. similarly when i click on archive the entire row cut from active PR's to Archived PR's sheet. i will be thank full if anyone help me as soon as possible.
Rated 4.5 out of 5
This comment was minimized by the moderator on the site
Hola, este mismo codigo funciona con power point? Pregunto por que necesito copiar y pegar la información de una diapositiva a otra. Muchas gracias.
This comment was minimized by the moderator on the site
Hi Ivan,
We only provide VBA scripts for Microsoft Excel, Word and Outlook. This VBA script does not apply to PowerPoint. Sorry for the inconvenience.
This comment was minimized by the moderator on the site
Cảm ơn bạn
Rated 4.5 out of 5
This comment was minimized by the moderator on the site
Cara, eu preciso copiar determinado dados, que são gerados todos os dias, mas salvos em planilhas diferentes, eu já criei a macro e salvei na PERSONAL, para conseguir usar em todas planilhas que abrir, mas não estou conseguindo colocar o código pra ele pegar esses dados, que se localizam sempre na mesma linha e coluna, ele sempre pega da planilha que eu realizei a macro, consegue me ajudar com isso ? Seria um código que sempre pega da planilha atual, aberta, e não da qual eu gravei a macro
This comment was minimized by the moderator on the site
Hi Gabriel,
If you need to copy data in different worksheets each time, you do not need to run the code with a command button.
After pressing the Alt + F11 keys to open the Basic Visual editor, click Insert > Module, and then copy the following VBA code into the Module (Code) window.
To copy data in any worksheet, you just need to open the worksheet, click Develper > macros to open the Macro window, select the macro name "CopyData" and then click the Run button to run the code.
https://www.extendoffice.com/images/stories/comments/comment-picture-zxm/copy_data.png

Sub CopyData()
    Application.ScreenUpdating = False
    Dim xSheet As Worksheet
    Set xSheet = ActiveSheet
        If xSheet.Name <> "Definitions" And xSheet.Name <> "fx" And xSheet.Name <> "Needs" Then
            xSheet.Range("A1:C17 ").Copy
            xSheet.Range("J1:L17").PasteSpecial Paste:=xlValues, Operation:=xlNone, SkipBlanks:=False, Transpose:=False
        End If

    Application.ScreenUpdating = True
End Sub
This comment was minimized by the moderator on the site
Hello,

I'm currently at using the following code:


Private Sub CommandButton1_Click()
Dim xSWName As String
Dim xSheet As Worksheet
Dim xPSheet As Worksheet
Dim xIntR As Integer
xSWName = "Aktiva"
On Error Resume Next
Application.ScreenUpdating = False
Set xSheet = ActiveSheet
If xSheet.Name <> "Definitions" And xSheet.Name <> "fx" And xSheet.Name <> "Needs" Then
xSheet.Range("A6:F60 ").Copy
Set xPSheet = Worksheets.Item(xSWName)
xPSheet.Cells.PasteSpecial Paste:=xlValues, Operation:=xlNone, SkipBlanks:=False, Transpose:=False
End If
Application.ScreenUpdating = True
End Sub


But I would it to copy the text to the next empty cell, currently it just pastes it at the top and overwrites what's currently there.
Can someone help me, so that when I use this "script/marco" it goes to the next possible empty space?

Thanks in advance,
Calle
This comment was minimized by the moderator on the site
Hi Calle,
Do you want to fill blank cells with value above in a certian range in Excel?
If so, perhaps the methods in this post can do you a favor.
How To Fill Blank Cells With Value Above / Below / Left / Right In Excel?
If I am not understanding correctly, please attach a screenshot of your data to describe it more clearly.
This comment was minimized by the moderator on the site
Please excuse me, I found my omission...

On the other hand, this soul generates a mail per recipient whereas I wish to write a single email (grouped) to all the recipients. I can't find what to change...
Could you help me in solving this problem please?

Thank you again for your help,
Cordially. Have a good day.
This comment was minimized by the moderator on the site
Hi Clément,
To avoid this error "Dim xOutApp As Outlook.Application" -> Undefined user-defined type, you need to check the Microsoft Outlook 16.0 Object Library box as shown in the screenshot above.
The above VBA code helps to create a separate email to each recipient listed in cells.
If you want to create a single email with all email addresses displayed in the Recipients field (see screenshot below), the following VBA code can help you to do it.
https://www.extendoffice.com/images/stories/comments/comment-picture-zxm/button_email.png
Private Sub CommandButton1_Click()
'updateby Extendoffice 20220901
    Dim xOTApp As Object
    Dim xMItem As Object
    Dim xCell As Range
    Dim xRg As Range
    Dim xEmailAddr As String
    Dim xTxt As String
    On Error Resume Next
    xTxt = ActiveWindow.RangeSelection.Address
    Set xRg = Range("A1:A3")
    If xRg Is Nothing Then Exit Sub
    Set xOTApp = CreateObject("Outlook.Application")
    For Each xCell In xRg
        If xCell.Value Like "*@*" Then
            If xEmailAddr = "" Then
                xEmailAddr = xCell.Value
            Else
                xEmailAddr = xEmailAddr & ";" & xCell.Value
            End If
        End If
    Next
    Set xMItem = xOTApp.CreateItem(0)
    With xMItem
        .To = xEmailAddr
        .Subject = "Test"
        .Body = "Dear " _
                & vbNewLine & vbNewLine & _
                "This is a test email " & _
                "sending in Excel"
        .Display
    End With
End Sub
This comment was minimized by the moderator on the site
Thanks !
I made it but I have an error on this line : "Dim xOutApp As Outlook.Application" -> Undefined user-defined type

I don't understand because I made steps described in your message... Can you help me again please ? :-/


Thanks a lot !
This comment was minimized by the moderator on the site
Hi there ! Great page, very practical for me... !
Is it posible to copy datas (a list of mails) and paste it directly in "recipients" on Outlook ? If it's possible, I don't know how to do it...

Can you help me please ?
This comment was minimized by the moderator on the site
Hi Clement,
If you want to click a button then copy a list of email addresses and paste them directly in the "To" field in Outlook. The following VBA code can help.
After adding the code, please click Tools > Reference, then check the Microsoft Outlook 16.0 Object Library box.
https://www.extendoffice.com/images/stories/comments/comment-picture-zxm/outlook_object_library.png

Private Sub CommandButton1_Click()
'Updated by Extendoffice 20220831
    Dim xRg As Range
    Dim xRgEach As Range
    Dim xRgVal As String
    Dim xAddress As String
    Dim xOutApp As Outlook.Application
    Dim xMailOut As Outlook.MailItem
    On Error Resume Next
    xAddress = ActiveWindow.RangeSelection.Address
    Set xRg = Range("A1:A3")
    If xRg Is Nothing Then Exit Sub
    Application.ScreenUpdating = False
    Set xOutApp = CreateObject("Outlook.Application")
    Set xRg = xRg.SpecialCells(xlCellTypeConstants, xlTextValues)
    For Each xRgEach In xRg
        xRgVal = xRgEach.Value
        If xRgVal Like "?*@?*.?*" Then
            Set xMailOut = xOutApp.CreateItem(olMailItem)
            With xMailOut
                .To = xRgVal
                .Subject = "Test"
                .Body = "Dear " _
                      & vbNewLine & vbNewLine & _
                        "This is a test email " & _
                        "sending in Excel"
                .Display
                '.Send
            End With
        End If
    Next
    Set xMailOut = Nothing
    Set xOutApp = Nothing
    Application.ScreenUpdating = True
End Sub
This comment was minimized by the moderator on the site
Hi
i need to insert a button in each row to copy the specific cell rage on the row and past it on different excel in one drive , Ex, multiple teacher working on excel and entering the student date and click the button ( post button ) once they click the date has to be actively updated in student master file in new row, (its like a dynamic consolidation of work )

If Teacher is correcting the row and clicking the post button again it needs to be verify the cell which has unique id for the student and replace the row in master file not to create duplicate row on master file on each click , i need last updated date and time on the master file in separate cell at the end of the row
This comment was minimized by the moderator on the site
Hi suriya prakash,
I am very sorry that I cannot help you with this issue yet.
This comment was minimized by the moderator on the site
In case when I am copying from one sheet to another using the below code (Using Shape - Not Button) The Value From "ToCopySHEET"!A14 is copied to J7 when the A1:A6 are Used Range but J column is empty. I want to copy it into J:J irrespective the A, B or any other column is Used but If J is vacant It must start from the first empty cell of "CopiedSHEET"!J:J.


Sub CopyToSheet()
'Updated by Extendoffice 20220729
Dim xSWName As String
Dim xSheet As Worksheet
Dim xPSheet As Worksheet
Dim xIntR As Integer
xSWName = "Copy Test Page"
On Error Resume Next
Application.ScreenUpdating = False
Set xSheet = ActiveSheet
If xSheet.Name <> "Definitions" And xSheet.Name <> "fx" And xSheet.Name <> "Needs" Then
xSheet.Range("A14").Copy
Set xPSheet = Worksheets.Item(xSWName)
xIntR = xPSheet.UsedRange.Rows.Count
xPSheet.Cells(xIntR + 1, 10).PasteSpecial Paste:=xlValues, Operation:=xlNone, SkipBlanks:=False, Transpose:=False
End If
Application.ScreenUpdating = True
End Sub
There are no comments posted here yet
Load More
Please leave your comments in English
Posting as Guest
×
Rate this post:
0   Characters
Suggested Locations