Как создать ежемесячный или ежегодный календарь в Excel?
Иногда возникает необходимость создать календарь на конкретный месяц или год в Excel. Как быстро справиться с этой задачей? В этом руководстве описаны простые и эффективные способы мгновенного создания ежемесячного или ежегодного календаря в Excel.
Создание ежемесячного или ежегодного календаря с помощью шаблона Excel
Создание ежемесячного календаря с помощью VBA
Легко создавайте ежемесячный или ежегодный календарь с помощью Вечный календарь
Создание ежемесячного или ежегодного календаря с помощью шаблона Excel
В Excel можно воспользоваться шаблоном календаря, чтобы легко создать ежемесячный или ежегодный календарь.
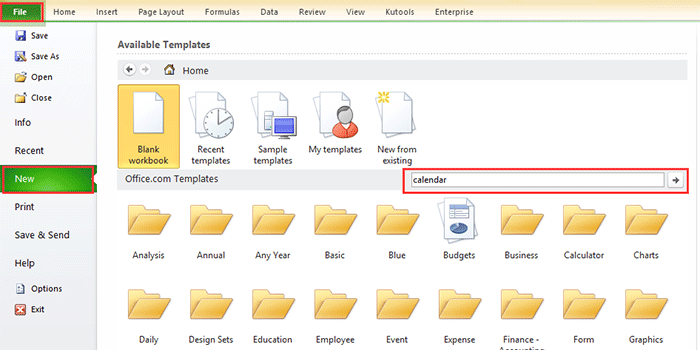
1. В Excel 2010/2013 нажмите Файл > Создать, в Excel 2007 — Кнопка Office > Создать, затем в правой части появившегося окна введите календарь в поле поиска. См. снимок экрана:
В Excel 2010/2013
В Excel 2007

2. Нажмите Enter, после чего в окне отобразятся различные типы календарей. Выберите нужный тип календаря и нажмите Загрузить (или Создать) на правой панели. См. снимок экрана:

Теперь календарь создан в новой рабочей книге. См. снимок экрана:

Создание ежемесячного календаря с помощью VBA
Иногда нужно создать календарь именно на один конкретный месяц — например, январь 2015 года. С помощью описанного выше метода подобрать подходящий шаблон календаря может оказаться не так просто. Ниже приведён код VBA, который поможет вам быстро создать календарь на нужный месяц.
1. Нажмите Alt + F11, чтобы открыть окно Microsoft Visual Basic для приложений, выберите Вставка > Модуль, а затем скопируйте и вставьте приведённый ниже код VBA в открывшееся окно.
VBA: создание ежемесячного календаря
Sub CalendarMaker()
       ' Unprotect sheet if had previous calendar to prevent error.
       ActiveSheet.Protect DrawingObjects:=False, Contents:=False, _
          Scenarios:=False
       ' Prevent screen flashing while drawing calendar.
       Application.ScreenUpdating = False
       ' Set up error trapping.
       On Error GoTo MyErrorTrap
       ' Clear area a1:g14 including any previous calendar.
       Range("a1:g14").Clear
       ' Use InputBox to get desired month and year and set variable
       ' MyInput.
       MyInput = InputBox("Type in Month and year for Calendar ")
       ' Allow user to end macro with Cancel in InputBox.
       If MyInput = "" Then Exit Sub
       ' Get the date value of the beginning of inputted month.
       StartDay = DateValue(MyInput)
       ' Check if valid date but not the first of the month
       ' -- if so, reset StartDay to first day of month.
       If Day(StartDay) <> 1 Then
           StartDay = DateValue(Month(StartDay) & "/1/" & _
               Year(StartDay))
       End If
       ' Prepare cell for Month and Year as fully spelled out.
       Range("a1").NumberFormat = "mmmm yyyy"
       ' Center the Month and Year label across a1:g1 with appropriate
       ' size, height and bolding.
       With Range("a1:g1")
           .HorizontalAlignment = xlCenterAcrossSelection
           .VerticalAlignment = xlCenter
           .Font.Size = 18
           .Font.Bold = True
           .RowHeight = 35
       End With
       ' Prepare a2:g2 for day of week labels with centering, size,
       ' height and bolding.
       With Range("a2:g2")
           .ColumnWidth = 11
           .VerticalAlignment = xlCenter
           .HorizontalAlignment = xlCenter
           .VerticalAlignment = xlCenter
           .Orientation = xlHorizontal
           .Font.Size = 12
           .Font.Bold = True
           .RowHeight = 20
       End With
       ' Put days of week in a2:g2.
       Range("a2") = "Sunday"
       Range("b2") = "Monday"
       Range("c2") = "Tuesday"
       Range("d2") = "Wednesday"
       Range("e2") = "Thursday"
       Range("f2") = "Friday"
       Range("g2") = "Saturday"
       ' Prepare a3:g7 for dates with left/top alignment, size, height
       ' and bolding.
       With Range("a3:g8")
           .HorizontalAlignment = xlRight
           .VerticalAlignment = xlTop
           .Font.Size = 18
           .Font.Bold = True
           .RowHeight = 21
       End With
       ' Put inputted month and year fully spelling out into "a1".
       Range("a1").Value = Application.Text(MyInput, "mmmm yyyy")
       ' Set variable and get which day of the week the month starts.
       DayofWeek = WeekDay(StartDay)
       ' Set variables to identify the year and month as separate
       ' variables.
       CurYear = Year(StartDay)
       CurMonth = Month(StartDay)
       ' Set variable and calculate the first day of the next month.
       FinalDay = DateSerial(CurYear, CurMonth + 1, 1)
       ' Place a "1" in cell position of the first day of the chosen
       ' month based on DayofWeek.
       Select Case DayofWeek
           Case 1
               Range("a3").Value = 1
           Case 2
               Range("b3").Value = 1
           Case 3
               Range("c3").Value = 1
           Case 4
               Range("d3").Value = 1
           Case 5
               Range("e3").Value = 1
           Case 6
               Range("f3").Value = 1
           Case 7
               Range("g3").Value = 1
       End Select
       ' Loop through range a3:g8 incrementing each cell after the "1"
       ' cell.
       For Each cell In Range("a3:g8")
           RowCell = cell.Row
           ColCell = cell.Column
           ' Do if "1" is in first column.
           If cell.Column = 1 And cell.Row = 3 Then
           ' Do if current cell is not in 1st column.
           ElseIf cell.Column <> 1 Then
               If cell.Offset(0, -1).Value >= 1 Then
                   cell.Value = cell.Offset(0, -1).Value + 1
                   ' Stop when the last day of the month has been
                   ' entered.
                   If cell.Value > (FinalDay - StartDay) Then
                       cell.Value = ""
                       ' Exit loop when calendar has correct number of
                       ' days shown.
                       Exit For
                   End If
               End If
           ' Do only if current cell is not in Row 3 and is in Column 1.
           ElseIf cell.Row > 3 And cell.Column = 1 Then
               cell.Value = cell.Offset(-1, 6).Value + 1
               ' Stop when the last day of the month has been entered.
               If cell.Value > (FinalDay - StartDay) Then
                   cell.Value = ""
                   ' Exit loop when calendar has correct number of days
                   ' shown.
                   Exit For
               End If
           End If
       Next

       ' Create Entry cells, format them centered, wrap text, and border
       ' around days.
       For x = 0 To 5
           Range("A4").Offset(x * 2, 0).EntireRow.Insert
           With Range("A4:G4").Offset(x * 2, 0)
               .RowHeight = 65
               .HorizontalAlignment = xlCenter
               .VerticalAlignment = xlTop
               .WrapText = True
               .Font.Size = 10
               .Font.Bold = False
               ' Unlock these cells to be able to enter text later after
               ' sheet is protected.
               .Locked = False
           End With
           ' Put border around the block of dates.
           With Range("A3").Offset(x * 2, 0).Resize(2, _
           7).Borders(xlLeft)
               .Weight = xlThick
               .ColorIndex = xlAutomatic
           End With

           With Range("A3").Offset(x * 2, 0).Resize(2, _
           7).Borders(xlRight)
               .Weight = xlThick
               .ColorIndex = xlAutomatic
           End With
           Range("A3").Offset(x * 2, 0).Resize(2, 7).BorderAround _
              Weight:=xlThick, ColorIndex:=xlAutomatic
       Next
       If Range("A13").Value = "" Then Range("A13").Offset(0, 0) _
          .Resize(2, 8).EntireRow.Delete
       ' Turn off gridlines.
       ActiveWindow.DisplayGridlines = False
       ' Protect sheet to prevent overwriting the dates.
       ActiveSheet.Protect DrawingObjects:=True, Contents:=True, _
          Scenarios:=True

       ' Resize window to show all of calendar (may have to be adjusted
       ' for video configuration).
       ActiveWindow.WindowState = xlMaximized
       ActiveWindow.ScrollRow = 1

       ' Allow screen to redraw with calendar showing.
       Application.ScreenUpdating = True
       ' Prevent going to error trap unless error found by exiting Sub
       ' here.
       Exit Sub
   ' Error causes msgbox to indicate the problem, provides new input box,
   ' and resumes at the line that caused the error.
   MyErrorTrap:
       MsgBox "You may not have entered your Month and Year correctly." _
           & Chr(13) & "Spell the Month correctly" _
           & " (or use 3 letter abbreviation)" _
           & Chr(13) & "and 4 digits for the Year"
       MyInput = InputBox("Type in Month and year for Calendar")
       If MyInput = "" Then Exit Sub
       Resume
   End Sub
Код VBA взят с этого веб-сайта https://support.microsoft.com/en-us/kb/150774
2. Нажмите F5 или кнопку Выполнить, после чего появится диалоговое окно с запросом на ввод конкретного месяца, для которого необходимо создать календарь. См. снимок экрана:

3. Нажмите ОК. Теперь календарь на январь 2015 года создан на текущем листе.

Однако описанные выше методы имеют определённые ограничения. Например, если вы хотите создать календарь сразу с января по май, придётся пять раз повторить процедуру, используя любой из двух указанных способов. Ниже представлено удобное решение, которое позволяет быстро и легко справиться с этой задачей.
Легко создавайте ежемесячный или ежегодный календарь с помощью Вечный календарь
Вечный календарь — одна из мощных утилит в составе Kutools для Excel, которая позволяет мгновенно создавать ежемесячные или ежегодные календари в Excel.
1. Нажмите KUTOOLS PLUS > Лист > Вечный календарь.
2. В появившемся диалоговом окне укажите период месяцев, за который нужно создать календарь, и нажмите Создать. См. снимок экрана:

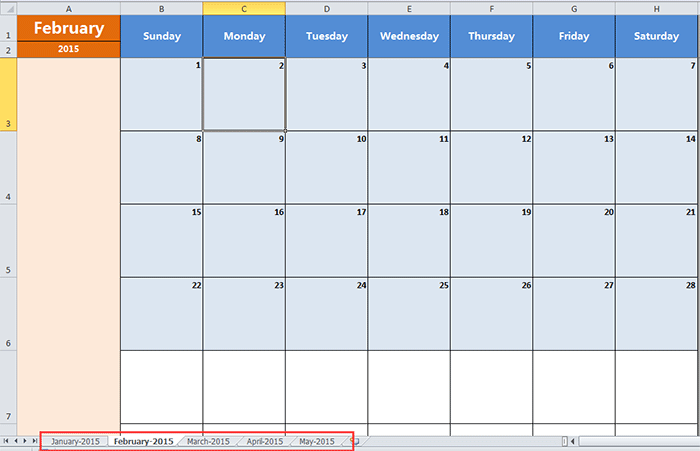
Затем создаётся новая рабочая книга с пятью календарными листами. См. снимок экрана:
Совет:
Если вы хотите создать календарь только на один конкретный месяц, просто укажите один и тот же месяц в обоих полях — «С» и «По» — в диалоговом окне.
Нажмите здесь, чтобы узнать больше о Вечный календарь
Лучшие инструменты повышения продуктивности в Office
Раскройте весь потенциал Excel с помощью Kutools для Excel и ощутите эффективность как никогда раньше.Kutools для Excel предлагает более 300 расширенных функций для повышения продуктивности и Экономия времени.Нажмите здесь, чтобы получить нужную Вам функцию…
Office Tab добавляет в Office вкладки и значительно упрощает Вашу работу
- Включите редактирование и чтение во вкладках в Word, Excel, PowerPoint, Publisher, Access, Visio и Project.
- Открывайте и создавайте несколько документов во вкладках одного окна — вместо того чтобы использовать отдельные окна.
- Повышает вашу продуктивность на 50 % и экономит сотни кликов мышью каждый день!
Все надстройки Kutools — один установщик
Kutools for Office — набор надстроек для Excel, Word, Outlook и PowerPoint, а также Office Tab Pro, идеально подходящий командам, работающим с разными приложениями Office.





- Единый комплект— надстройки для Excel, Word, Outlook и PowerPoint + Office Tab Pro
- Один установщик, одна лицензия— настройка занимает считанные минуты (готово для MSI)
- Лучше работать вместе— оптимизированная продуктивность во всех приложениях Office
- 30-дневная полнофункциональная пробная версия— без регистрации и кредитной карты
- Лучшее соотношение цены и качества— экономия по сравнению с покупкой отдельных надстроек